JoY! simulates virtual drug use in Second Life. Your HUD follows drug effects, addiction, tolerance, resistance, and purity so that your avatar’s condition can develop throughout a roleplay.
You decide how the simulation fits your story: an occasional party experience, regular use, or a character living with addiction. The system supplies changing effects and states while you continue interacting with the world.
What to expect while playing
A single trial use does not immediately create addiction. Repeated use is tracked by the habit system.
Effects and avatar behavior can vary, so sessions do not always unfold the same way.
You can still interact with your surroundings while high or unwell.
Drug animations are designed to work alongside your current pose.
The HUD sends its feedback privately to keep the interface discreet.
JoY! is designed for drug roleplay. It does not replace a collar or a dedicated kidnapping or rape system. Some simulated states do change RLV permissions; read the state and role guides before playing.
The system continues to evolve, and behavior can depend on your viewer. Read Updating your HUD when a new release arrives.
START HERE
Prepare your viewer
JoY! uses RLV restrictions to produce its virtual drug effects and to keep an addicted user's HUD attached. Set up your viewer before attaching the HUD.
Use a viewer that supports RLV and the RLVa features JoY! needs. The official Linden Lab viewer does not meet this requirement.
Enable RLVa support in the viewer.
Check the HUD's chat messages after attaching it for any compatibility warnings.
If the HUD repeatedly detaches, check whether RLVa is enabled. JoY! may detach when it cannot detect the required support; the HUD's chat output can help identify the cause.
Marine's RLV, Kokua, and viewers without RLVa support may lack the vision-distortion restrictions used by JoY!. A compatibility warning means some visual effects may be unavailable.
Check PBR compatibility
Viewer versions that introduced PBR also affected some RLV commands. Reported problems vary by operating system, particularly on macOS and Linux, and can reduce the visual effects JoY! displays. The JoY! developers have worked around these issues where possible.
Earlier Linux guidance recommended Firestorm 6.6.17 after newer releases displayed drug effects as a green screen. Kokua's PBR viewer showed fewer problems, although some effects still behaved unexpectedly. Alchemy was identified as the preferred option for combining PBR with JoY! in those compatibility reports.
The related Firestorm issue reports describe the affected viewer behavior:
A later Linux test reported that Firestorm 7.2.2 resolved the RLVa sphere issue. This updates the earlier version-specific guidance; check which viewer version a compatibility report concerns.
Understand the intended audience
JoY! simulates drug use for roleplay in Second Life. The JoY! development team does not promote or encourage real-world drug use.
These products are adult rated. Use them only if you meet the legal age of adulthood in your country. Avoid JoY! if themes of drug use or addiction are unsuitable for you.
START HERE
HUD controls and capabilities
Choose a HUD for the role you want to play, then use its controls to find users, read their status, and provide help.
Choose your HUD
All three JoY! HUDs use the same consumption and addiction system. Dealers and medics can consume virtual drugs and become addicted through their own HUDs.
Capability
JoY! HUD
JoY! Medic HUD
JoY! Dealer HUD
Consume virtual drugs
x
x
x
Develop addiction
x
x
x
Shitty mornings
x
x
x
HARD mode
x
x
x
End an effect with RUIN (outside HARD mode)
x
x
x
Certify virtual drugs
x
Stop PA2
x
x
x
Hide from public online listings
x
x
Find JoY! users on the same parcel
All
All
Scan nearby users
All (saliva + blood)
All (saliva)
Inject nearby users
All (embedded supplies)
All (embedded supplies + Heroin)
Maintain a customer or patient list
1 patient
Up to 30 JoY! HUD users
Administer Ketamine
x
x
Administer Phenobarbital
x
End a pass-out
x
Relieve withdrawal symptoms
x
Use cumJoY! HUD
x
x
x
Note: An x marks an available feature. The Medic HUD was introduced with JoY! 3.0; its features do not work as intended with JoY! HUD versions 1.x or 2.x.
Find a dealer with the red phone
The standard JoY! HUD displays a red phone when you are sick. Select it to receive a grid-wide list of 10 randomly selected online dealers, then contact someone on that list to arrange help. This control is exclusive to the standard HUD.
Use the dealer and medic controls
These controls appear when the relevant users or actions are available. A customer or patient relationship changes when the HUD asks for consent; see Getting help before accepting one.
Radar
The radar becomes available when another JoY! user is on your parcel. Select it to list those users. A message prefix identifies the HUD sending the message; it does not identify the listed user's role.
Information and scans
The information control appears when a JoY! user is within 5 meters. Use it to read their status, addiction level, and favorite drug. The target may need to approve the scan unless they are your registered customer or patient.
A scan is the HUD's way to report Hard mode. An addicted user with Hard mode enabled appears as Hard; other users appear as Normal.
Medic scans also report Ketamine efficiency, consumption history with drug names and amounts, exact addiction percentage, and a rehabilitation estimate. The rehabilitation time is accurate during sickness; outside sickness it is an estimate. For a non-addicted user who is recovering, the time describes their return to normal.
Injection menu
The syringe control appears when a target is within 5 meters. Choose a user and an available injectable. The HUD may request the target's approval unless your customer or patient relationship already grants permission.
Heroin: Dealer HUD only. Load the dedicated JoY! HUD Heroin (x10) package by adding it as a HUD. Ordinary syringes cannot be dragged into the HUD, and the Medic HUD cannot hold Heroin.
Ketamine: Available to dealers and medics. It can reduce addiction to a minimum of 2%.
Phenobarbital: Dealer HUD only. Available near a user who has passed out. It adds 5 minutes of deep sleep and grants teleport RLV exceptions for those 5 minutes.
Withdrawal medicines: Medic HUD only. Choose the substitute that matches the patient's favorite drug.
Note: Withdrawal medicines, Ketamine, and Phenobarbital are built into the relevant HUD. Shops do not sell separate supplies of them.
Customer list
Open the Dealer HUD menu and select the plus (+) control to invite a user. They must accept before joining your list, which holds up to 30 customers. The list control provides options to display the list, remove one customer, or clear it.
A listed customer no longer receives individual scan or injection approval prompts. The customer cannot remove themselves from the list; the dealer must remove them. Explain this before sending an invitation.
Open the Medic HUD menu and choose the user you want to treat.
Ask the user to accept the patient invitation. The Medic HUD supports 1 patient at a time.
Check the current patient status before treatment. While the relationship is active, scans and injections do not require a new approval prompt.
Select CLEAR to release the patient. After teleporting to another parcel or relogging, check the connection and invite the patient again if necessary.
Note: Patient permission is temporary. Check that the intended patient is still registered before relying on it.
Control your public availability
Online dealer and medic profiles can appear on the main store's TV, where users can open their Second Life profiles. Online dealers can also appear in red-phone results. Be prepared to answer people who contact you through these listings.
Use Online to switch to private mode and hide from those public listings. Select it again to return to public mode. See HUD options for the visibility setting.
Change HUDs without overlapping them
You can move between the standard, Dealer, and Medic HUDs, but switching is discouraged because it can lose data. Consumption history is particularly vulnerable because it is not stored off-grid.
If switching to the Medic HUD, first reach a clean state with no addiction.
Remove the HUD you are currently wearing.
Add the replacement HUD and review its startup messages.
Version 3.1.4 has a reported issue: wearing the Medic and Dealer HUDs together while switching can delete Heroin stored in the Dealer HUD. Remove one before adding the other.
Prevent attachment problems
Keep JoY! HUDs out of outfit links. An outfit change can otherwise attach an unintended HUD or an older version. A favorite-wearables shortcut is a better way to find the HUD.
Allow consumed virtual-drug attachments to detach. RLV restrictions that prevent detachment can leave an empty item attached and repeatedly printing its empty drug message.
START HERE
Using a dose
A JoY! drug item is a single-use dose. You can use it directly from inventory or place it in the world and touch it. Both methods need your JoY! HUD to record the intake.
Keep at least one attachment slot free, especially when touching a rezzed dose.
The drug item does not check whether you are wearing a JoY! HUD. Using it without the HUD can show visual effects, but the dose is spent without recording its effect in the system.
Use a dose from inventory
Find an unused drug item in your inventory.
Select Add to attach it to your avatar.
Allow the item to run and watch for the intake confirmation in chat.
The item detaches automatically after use. The empty item remains in inventory and cannot supply another dose. If you rez an empty item, it deletes itself.
Use a dose placed in the world
Rez an unused dose on land where you have permission to rez objects.
Move within 3 meters and touch the item.
Let the temporary attachment finish its intake sequence.
This method removes the empty object automatically when it finishes. It avoids leaving spent items mixed with your unused stock.
A temporary attachment can fail when your attachment slots are full. The item may disappear without applying its effect. Check that a slot is free before touching the dose.
You cannot rename or delete an item while it is attached. If you regularly use doses from inventory, separate unused stock from spent items after they detach.
Keep temporary attachments through intake
Temporary attachments are lost if you log out or crash. They do not appear in inventory and cannot be taken back into it.
The chat output you just drug yourself with... confirms that JoY! has recorded the intake. After that confirmation, losing the temporary attachment interrupts its remaining visual effect; the recorded intake is already in the system.
After a crash, Second Life may restore an attachment’s scripts to an earlier saved state. Your HUD can therefore appear to have rolled back. A normal logout and login helps save script state when you need a checkpoint; allow any temporary dose to finish first.
Share doses during roleplay
Drug items have no modify / no copy / transfer permissions.
Giving a dose to another avatar transfers the item out of your inventory.
Anyone within 3 meters can touch and consume a rezzed dose. Keep an eye on stock left in public.
Most drug animations are skipped while your avatar is seated; some animations that only move the arms can still play.
A dealer can administer Heroin directly using the Dealer HUD. See Dealer and medic help for permissions and assistance.
Read a Nexus drug test
The Nexus Drug Test Kit recognizes JoY! drugs. Its results identify them as JoY! (name).
This is an example of the kit’s chat output. Labels, capitalization, and names below are shown as they appear in the log.
[02:12] Nexus Urine Sample Cup: ------------------------------------
[02:12] Nexus Urine Sample Cup: Patient: Mattie Absinthe
[02:12] Nexus Urine Sample Cup: Date: 2024-05-03 (YYYY-MM-DD)
[02:12] Nexus Urine Sample Cup: ------------------------------------
[02:12] Nexus Urine Drug Analyzer: Testing Sample...
[02:12] Nexus Urine Drug Analyzer: Sample Results
[02:12] Nexus Urine Drug Analyzer: --------------------------------
[02:12] Nexus Urine Drug Analyzer: JoY! (heroin)
[02:12] Nexus Urine Drug Analyzer: JoY! (meth)
[02:12] Nexus Urine Drug Analyzer: JoY! (cocaine)
[02:12] Nexus Urine Drug Analyzer: JoY! (cannabis)
[02:12] Nexus Urine Drug Analyzer: JoY! (alcohol)
[02:12] Nexus Urine Drug Analyzer: --------------------------------
UNDERSTAND YOUR AVATAR
Understand your HUD state
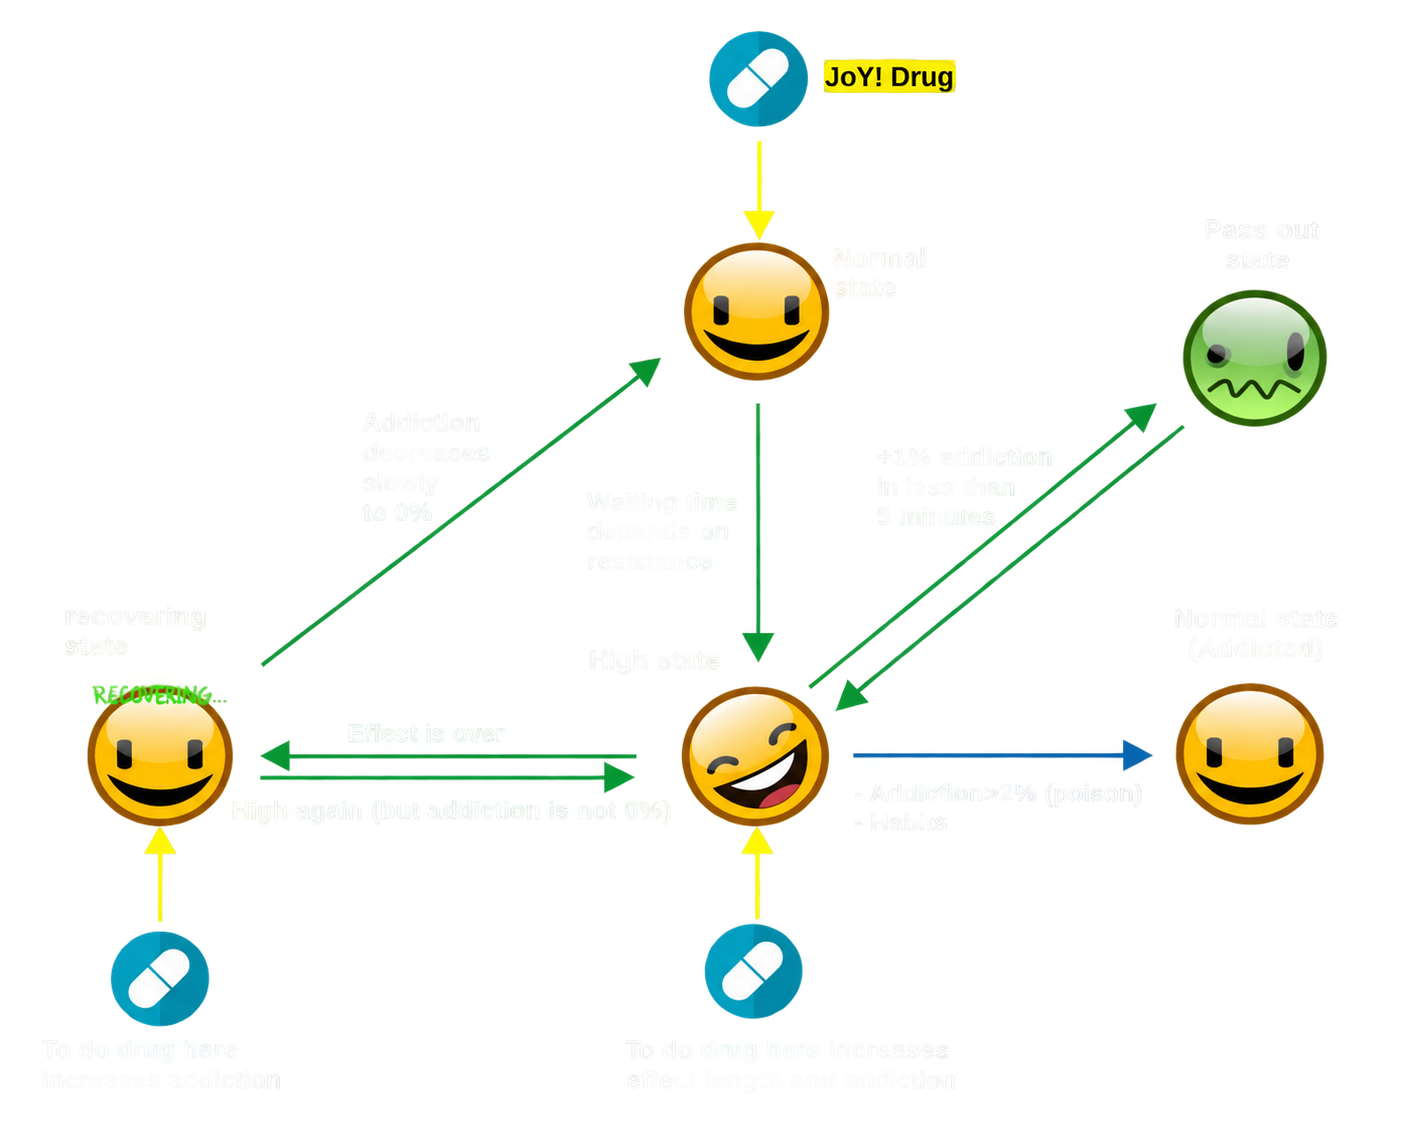
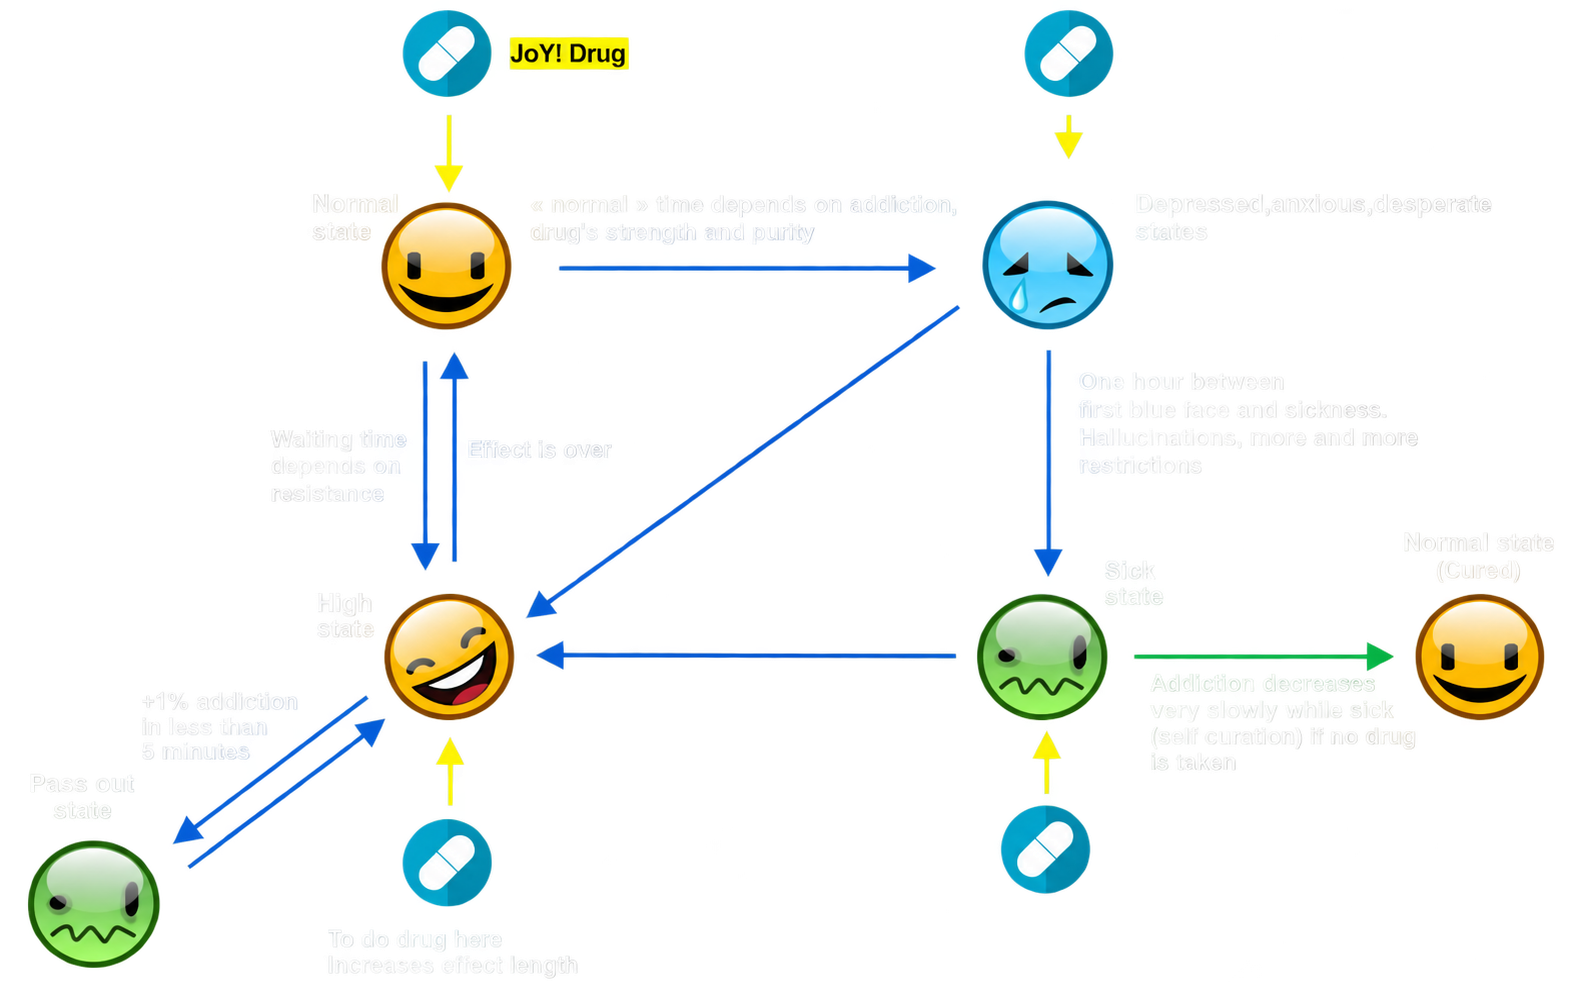
The face on your HUD identifies your current state. JoY! follows one of two paths: a healthy avatar recovers after the effects end; an addicted avatar moves between drug effects, symptom-free time, withdrawal, and sickness.
Before addiction: effects and recovery
A new or healthy HUD starts with 0% addiction. You can use any supported drug, but each dose adds to your addiction level.
Normal: your addiction is 0% and no drug effect is active.
High: the drug begins producing its effects.
Recovering: after the effects end, your addiction gradually falls to 0%.
Normal again: recovery is complete.
Reaching 2% addiction switches you to the addicted path. Repeated use of the same drug can also trigger addiction through the habit tracker.
Recovery information: the HUD deliberately hides your current addiction percentage and the time needed to reach 0% while recovering. A dealer can inspect your data, including your addiction level.
Wait for recovery to finish before another dose if you want to avoid carrying addiction into the next session. Even a low-addiction drug such as Cannabis can activate the habit tracker when used repeatedly. The addiction values help you estimate what each dose adds.
Faces while healthy
Normal: addiction is 0%. You can detach the HUD in this idle state and attach it again when you want to use JoY!.
High: effects are active. Another dose can extend the effects or combine effects from different drugs. Each dose also increases addiction.
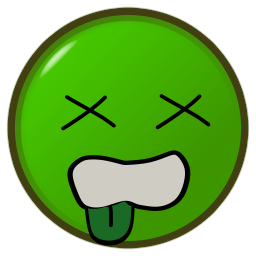
Passed out: gaining more than 1% addiction in less than five minutes can make you faint. The standard duration is two minutes. Read what happens during a pass-out before combining doses.
Recovering: the effects have ended and addiction is falling toward 0%. A dose taken now adds its addiction value to the amount still remaining.
On the addicted path, doses continue to add addiction and the ordinary recovery stage is unavailable. When a drug's effects finish, you return to Normal for a limited time. Withdrawal follows as that time runs out.
The HUD remains attached because addiction locks it.
Taking a dose adds time before withdrawal and can extend or combine drug effects.
Increasing tolerance shortens both the effects and your symptom-free Normal time.
Without another dose, withdrawal progresses to sickness.
Faces while addicted
Normal: you are currently free from withdrawal symptoms. You can take a dose during this period to add more Normal time.
Non-certified High: Hard mode uses this face when a non-certified drug is producing effects.
Healed: treatment is relieving symptoms while you are in withdrawal.
High: drug effects have started. Additional drugs can combine effects, extend their duration, and add Normal time. As tolerance increases, each dose produces a shorter effect.
Passed out: the same rapid-dose rule applies: more than 1% addiction gained in less than five minutes can cause a two-minute pass-out. Read the restrictions and treatment options.
Withdrawal: the first sad face appears one hour before sickness. Symptoms become stronger through three stages:
60–30 minutes remaining: low mood, sadness, and shaking hands.
30–15 minutes remaining: anxiety, fear of nearby people, and hallucinations.
15–0 minutes remaining: desperation and worsening symptoms, followed by sickness if no drug is taken.
A medic can relieve discomfort and remove some or all hallucinations.
Sick: the world appears dark and your vision becomes blurred. Addiction now decreases very slowly. Staying sick can eventually return you to the healthy path with the status cured; this may take hours or days, depending on your addiction level.
A medic can ease the discomfort and hallucinations during this process. In Hard mode, this face also identifies a pass-out caused by a non-certified drug.
New drug: trying a drug you have not used before can display this face. It currently introduces no additional event.
UNDERSTAND YOUR AVATAR
Addiction and withdrawal
Addiction changes how your HUD behaves. You can become addicted by accumulating 2% addiction or by repeatedly using the same drug. After that point, tolerance reduces the time gained from each dose and withdrawal develops when your Normal time runs out.
How repeated use creates a habit
The habit tracker records which drug you use most and how often you take it. It can trigger addiction even if your addiction level has stayed below 2%.
The documented trigger is four uses of the same drug, with at least one use per hour. Reaching 2% already causes addiction directly, so the habit rule applies before that threshold.
When a habit triggers addiction, your level becomes 2%. The tracker then stops running to reduce script usage.
What happens when you pass out
Gaining more than 1% addiction in less than five minutes can cause a pass-out. The usual duration is two minutes, with RLV restrictions that prevent hearing, seeing, and speaking.
Consent changes during a pass-out: dealers can inspect your data or inject Phenobarbital without asking for consent. Phenobarbital adds five minutes of sleep and allows the dealer to force-teleport you during that period.
A medic can end the pass-out immediately with Naloxone.
Recognize withdrawal and sickness
A sad blue face marks the start of withdrawal. Symptoms intensify until sickness and can include unsettling sounds and messages, paranoia, and hallucinations created through RLV effects and Windlight settings.
During sickness, Second Life appears grey and visually degraded, although you can still use it. The HUD state reference explains the three withdrawal stages and their timings.
Medics can relieve these symptoms while you work through recovery, including during rehabilitation roleplay. Treatment of symptoms and reduction of addiction are different functions; see treatments and recovery.
Why a dose lasts less as addiction rises
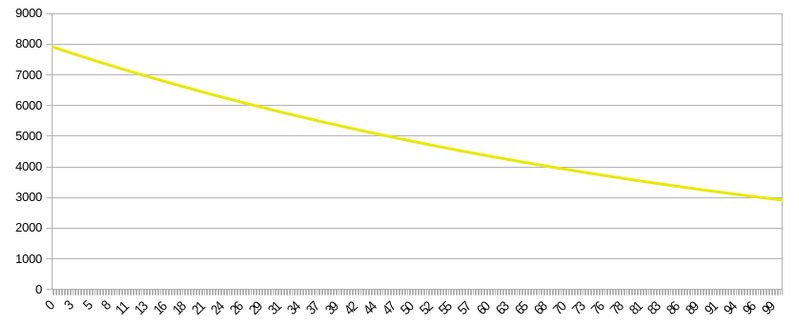
Tolerance means a dose provides less effect time and less Normal time as addiction increases. Normal time is the period before withdrawal begins; it is separate from the time spent High.
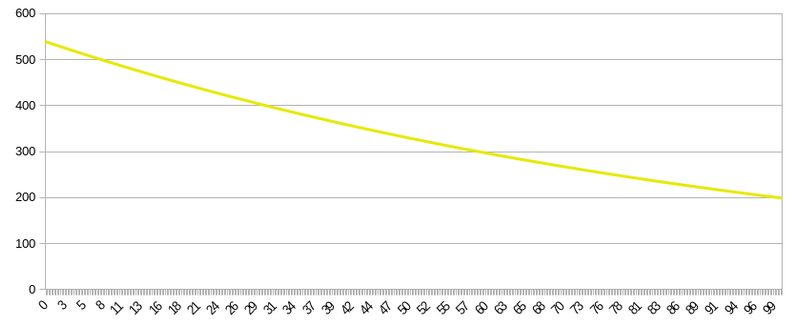
The charts use an example avatar with medium resistance who takes Heroin whenever sickness begins, using a purity value of 0.6. Both durations are measured in seconds against addiction percentage.
Normal time decreases as addiction increases in this Heroin example.The same increase in addiction also shortens the drug's effects.
Normal time limits: the maximum is four hours and the minimum is 0.5 hour, or 30 minutes. Depending on the drug, shaking can therefore return only 30 minutes after a dose.
A single dose does not guarantee five hours without withdrawal. For example, smoking Cannabis while sick does not provide that amount of Normal time.
If you repeatedly wait for the sad face before taking a dose, increasing tolerance can reduce the Normal time it gives you quickly. Maintaining the same interval then requires more drugs.
UNDERSTAND YOUR AVATAR
Drug effects and statistics
Drug effects come from both the attached JoY! item and your HUD. The item produces elements such as overlays or blur; the HUD also manages effects and tracks your state and addiction.
Effects last between 1.5 and 30 minutes. Most change what you see through distortion, colors, flashes, or other visual effects. JoY! does not rewrite your messages or prevent speech as part of these drug effects.
Compare supported drugs
The consumption method belongs to the item. Purity and addiction describe its behavior in the JoY! simulation; the numerical reference tables below give the corresponding values.
Drug
Method
Characteristics
🐉 Heroin
Injected
Medium purity range with a high addiction contribution. Use cautiously.
❄️ Cocaine
Sniffed
Medium purity range with a high addiction contribution. Use cautiously.
🥦 Cannabis
Smoked
The lightest option, with a broad range of purity values.
🌺 Opium
Smoked
Medium purity range with a high addiction contribution. Use cautiously.
🚬 Crack
Smoked
Medium purity range with a high addiction contribution. Use cautiously.
💎 Meth
Smoked
Medium purity range with a high addiction contribution. Use cautiously.
💠 LSD
Swallowed
Medium purity range and addiction contribution.
💊 MDMA
Swallowed
Medium purity range and addiction contribution.
🐊 Krokodil
Injected
Low purity and quality, but a strong addiction contribution. It costs less than Heroin; use cautiously.
🍸 Alcohol
Drunk
High, relatively consistent purity with a high addiction contribution.
🍶 Sake
Drunk
Medium purity range with a high addiction contribution.
How resistance changes a dose
Attaching a drug does not start its effects immediately. There is an onset delay while the system simulates the drug spreading through your avatar's body; no effect occurs during that wait.
Avatar data, including gender and height, determine resistance. Higher resistance means a longer onset delay, a shorter drug effect, and a longer Normal period before withdrawal.
Read the numerical properties
Purity varies between doses. Addiction contribution is a fixed value for each drug. Together with resistance and tolerance, these properties explain why two sessions can have different durations.
Purity ranges and their effect on duration
Each dose receives a random purity value within the range for that drug. This simulates differences in ingredients, raw materials, and production quality.
Drug
Minimum purity
Maximum purity
🐉 Heroin
0.4
0.8
❄️ Cocaine
0.5
0.9
🥦 Cannabis
0.3
0.8
🌺 Opium
0.4
0.9
🚬 Crack
0.5
0.9
💎 Meth
0.5
0.9
💠 LSD
0.6
0.9
💊 MDMA
0.4
0.8
🐊 Krokodil
0.1
0.3
🍸 Alcohol
0.7
0.9
🍶 Sake
0.4
0.6
Purity affects both the duration of the drug's effects and the amount of Normal time it provides. A dose can therefore last longer or shorter than another dose of the same drug.
Alcohol as an in-world fallback: the system describes Alcohol as the legal hard-drug option, with factory production represented by a high and fairly stable purity. Its low cost and broad availability can make it an alternative when an addicted avatar cannot reach a dealer. Keep L$10 in reserve for this fallback, and check the vendor's price before buying.
Addiction added by each dose
Every dose adds the fixed addiction value below. As total addiction increases, tolerance shortens your effects and Normal time. See how tolerance works.
Drug
Addiction added (%)
🐉 Heroin
0.8
❄️ Cocaine
0.8
🥦 Cannabis
0.2
🌺 Opium
0.85
🚬 Crack
0.9
💎 Meth
0.9
💠 LSD
0.6
💊 MDMA
0.4
🐊 Krokodil
0.95
🍸 Alcohol
0.6
🍶 Sake
0.45
Configure the simulated hearing effect
One effect makes nearby local chat harder to understand when you are High or sick. For the intended experience, disable the viewer setting that displays ellipses for restricted chat:
Press Ctrl + Alt + D to enable the Advanced menu.
Open Show Debug Settings.
Find RestrainedLoveShowEllipsis.
Set its value to FALSE.
Use the Cure item to reset addiction
Cure is a special item that restores the healthy HUD path, sets addiction to 0%, and changes your status to cured.
Hardcore exception: Cure leaves a Hardcore user's addiction at 2%. You must finish recovery through the sickness stage.
UNDERSTAND YOUR AVATAR
Treatments and recovery
JoY! treatment tools have different purposes: Ketamine reduces addiction, substitutes relieve withdrawal, and Naloxone ends a pass-out. The Dealer HUD also includes Phenobarbital, which extends a passed-out avatar's sleep.
Reduce addiction with Ketamine
Both the JoY! Dealer HUD and JoY! Medic HUD include Ketamine. Its reduction of addiction depends on your resistance, your current addiction level, and your favorite drug.
Ketamine becomes less effective when any of the following increases:
Your addiction level.
Your avatar's resistance.
The strength of your favorite drug.
The system reports Ketamine efficiency at startup. Ketamine has no effect on healthy users and cannot reduce addiction below 2%.
Match withdrawal treatment to the drug
A medic uses the patient's data to choose the corresponding substitute from this reference. The correct choice removes withdrawal symptoms for one hour. An incorrect choice leaves some symptoms active and provides a much shorter period of relief.
Drug
Withdrawal substitute
🐉 Heroin
Methadone
❄️ Cocaine
Modafinil
🥦 Cannabis
Bupropion
🌺 Opium
Buprenorphine
🚬 Crack
Disulfiram
💎 Meth
Disulfiram
💠 LSD
Benzodiazepine
💊 MDMA
Benzodiazepine
🐊 Krokodil
Methadone
🍸 Alcohol
Baclofen
🍶 Sake
Baclofen
End a pass-out with Naloxone
Naloxone is the anti-overdose treatment. A medic can use it to stop a patient's pass-out immediately.
Understand the effects of Phenobarbital
The JoY! Dealer HUD includes Phenobarbital for use on a customer who has already passed out. It adds five minutes of sleep and grants the dealer an RLV teleport exception for those same five minutes.
Pass-out restrictions: consent is disabled while the customer is unconscious. The dealer can inject Phenobarbital and force-teleport the customer to another location during its five-minute window.
A pass-out can follow a gain of more than 1% addiction in less than five minutes. Reaching that amount requires a combination of at least two drugs from the listed addiction values. You can take a second drug before the first finishes; direct injections have an additional restriction against repeated spamming.
This interaction also depends on the participants' roleplay. The dealer guide explains how to use dealer tools within a scene.
COMMUNITY
VENDORS
We have in-world roleplay vendors and normal vendors at Fox District.
These vendors are run and hosted by the JoY! community.
Where to buy
Get 10-packs from the back of the van.
Get 100-packs and 1000-packs across the street at the motel.
All pack sizes are also available from the vendors on the wall inside the drug store.
The more you buy at once, the cheaper it becomes.
Price table
Drug
10 pack
100 pack
1000 pack
🐉 Heroin
L$50
L$420
L$3350
❄️ Cocaine
L$50
L$420
L$3350
🥦 Cannabis
L$22
L$180
L$1250
🌺 Opium
L$50
L$420
L$3350
🚬 Crack
L$50
L$420
L$3350
💎 Meth
L$50
L$420
L$3350
💠 LSD
L$40
L$360
L$3000
💊 MDMA
L$25
L$190
L$1550
🐊 Krokodil
L$36
L$310
L$2550
🍸 Alcohol
L$40
L$360
L$3000
🍶 Sake
L$40
L$360
L$3000
COMMUNITY NEW
JoY! Growables
Player Guide
JoY! Growables is a third-party system, run and hosted by the JoY! community.
What are JoY! Growables?
JoY! Growables are reusable Second Life breedables that let you grow and collect certified JoY! drugs for your in-world experience. Buy a Growable once, rez it, let its countdown finish, and harvest your supply. Then do it again!
Each drug may have a different growing delay, also called a cooldown. Your Growable shows exactly how long remains until its next harvest.
One purchase. Unlimited repeat harvests. There is no cap on the total number of drugs you can collect through repeated harvests. Each harvest still requires its cooldown to finish. Keep using your Growable and your one-time purchase keeps delivering value: the more you harvest, the lower your purchase cost per harvest.
Where to buy
Visit JoY! in Fox District to buy your Growables in-world:
Find your purchased Growable in your inventory and drag it onto the ground. Choose land where you have permission to rez objects and run scripts.
2. Let it activate
Your Growable activates automatically. Give it a moment to check its status and display its countdown.
A brand-new Growable starts with a full growing period. Its first cooldown begins when it activates; it is not ready to harvest immediately. A transferred Growable keeps its existing cooldown or ready status.
3. Watch it grow
The text above your Growable shows the time remaining in hours, minutes, and seconds. It updates as the countdown runs. Depending on the growable, its appearance may also change through growing stages.
Hover text
What it means
White text with a countdown
Still growing. Wait until the timer finishes.
Green text saying you can harvest or collect
Ready! Touch the Growable to open its menu.
Checking availability or retrying
It is checking its status. Give it a moment.
Different drugs can have different cooldowns. Follow the timer on the particular Growable you are using.
4. Touch and harvest
When it is ready, touch your Growable, then choose Harvest or Collect, depending on the growable's menu label.
Touching opens the menu; you still need to choose the harvest or collect button. Only the object's current owner can use its menu and collect from it.
Wait for the confirmation message. After a successful harvest, the next cooldown begins automatically.
5. Receive your drugs
You will receive your drugs shortly after harvesting or collecting. Stay online for delivery, check your inventory, and accept any delivery offer that appears.
If you have not received your drugs within 5 minutes after a successful harvest while remaining online, contact BossyIsabella Resident in-world for support.
Once the next countdown finishes, return to your Growable and harvest again. There is no total harvest limit.
Using the menu
Harvest / Collect: Collects when the Growable is ready. If you try early, it tells you how much time remains.
Your dealer, when available: Shows the JoY! dealer contact and guide.
If the menu times out, simply touch your Growable again to open a fresh one.
Everyday use
Do I need to stay online while it grows?
No. Your Growable keeps growing while you are offline as long as it stays rezzed with its script running and able to contact the service. If it becomes inactive, its growing period pauses and resumes when it becomes active again. Come back when it is ready, harvest, and stay online to receive your delivery.
What if I miss the moment it becomes ready?
You can harvest later. A ready Growable waits for you to collect; it does not automatically harvest or accumulate extra harvests for every cooldown you leave it waiting. Its next growing period starts when you successfully harvest.
Can I own more than one Growable?
Yes. Each separate Growable has its own countdown, even when you own several of the same drug type. Check and harvest each one individually.
Can I move it or take it back into inventory?
Yes. Taking the same Growable into inventory pauses its growing period after its activity check expires. Rezzing it again as the same owner resumes its saved progress instead of starting over. Let it check its status after you rez it again. If it was already ready, it stays ready for collection when rezzed again.
Can I transfer it to another avatar?
Yes. The cooldown belongs to the Growable itself and carries over when it is transferred. The new owner should rez it and let it check its status: it keeps its remaining growing time, and a Growable that was already ready can be harvested straight away. The person who harvests receives the drugs and the harvest credit. Each harvest starts the same Growable's next cooldown, even if it is transferred again.
Do I need to buy another Growable after harvesting?
No. Your Growable is reusable. The one-time purchase lets you keep returning for more harvests, with the growable's cooldown between each one.
Troubleshooting and support
Nothing happens when I touch it. Make sure you are the object's owner and that scripts are allowed where it is rezzed. If its menu expired, touch it again.
It says it is not ready. Check the countdown. Selecting Harvest early does not shorten the growing period.
It says the service is unavailable or is retrying. Leave it a moment to retry automatically. Wait for an updated status before trying to harvest again. If the problem persists, contact support.
My harvest could not be confirmed. Allow the Growable to check its status again. If its next countdown has started, check your inventory and wait for delivery. If no drugs arrive within 5 minutes while you remain online, contact support.
It shows “Unable to initialize” or “MALICIOUS COPY”. Contact support with the message and your purchase details so the growable can be checked.
I harvested but have not received anything. Stay online, check your inventory and any pending delivery offer, and allow up to 5 minutes. If your drugs still have not arrived, contact BossyIsabella Resident in-world.
When asking for help, include your avatar username, the Growable's name or drug type, approximately when you harvested or encountered the issue, and any message it displayed. A screenshot can also help.
JoY! Missions is a third-party system, run and hosted by the JoY! community, as part of JoY! Growables.
Welcome to Fox District 🧭
Everybody needs a favor. Somebody has a secret. And somehow, you're the one doing the legwork.
JoY! Missions are free roleplay quests around Fox District. Meet the neighborhood's characters, follow their stories, remember what they tell you, collect quest items and complete activities to earn bonus Wheel of Fortune spins.
You do not need to buy a Growable or HUD, own land, or reach a harvest total to play. Wear your JoY! Growables group tag, bring your curiosity, and choose a mission.
Wear the JoY! Growables group tag. Joining the group is not enough; make its tag active before touching a board. If needed, follow the group invitation or link you receive.
Stand close to a Missions board and touch it. Check the featured mission's name, difficulty and bonus-spin reward.
Choose Start mission. Wait for the confirmation and directions to your first stop.
Visit the named character, item or activity. Follow the current objective until you complete the story.
Boards feature a randomly selected mission for 15 minutes, with a countdown until the next change. If you would prefer another mission, check back after the countdown. A board changing its featured mission does not replace a mission you have already started.
Choose your challenge
Difficulty
What to expect
🟢 Easy
Straightforward favors, clear directions and a simple detail to remember.
🟡 Normal
More connected clues, several contacts, and a mix of collecting and practical jobs.
🔴 Hard
Longer routes, more work and several details to remember across different conversations. Listen carefully: a name, phrase or instruction may matter much later.
Mission length and rewards vary. Check the reward shown for the featured mission before starting. Your active mission keeps its progress across daily resets, so you can finish it another day.
Talking to characters 💬
Stand close to the NPC and touch them to open their dialogue. Read the whole message before choosing an answer. Important clues appear inside the dialogue, so pay attention to who said what and which instruction belongs to which person.
Some conversations simply continue the story. Others test your memory or ask you to make a decision. A wrong answer or refusing a job can fail the mission, so choose carefully.
Closing a dialogue or letting it time out does not fail the mission. Touch the NPC again to continue. If you visit the wrong character, or return before finishing their task, they can remind you what to do next. Reminders help with the objective; they do not repeat the answers to memory questions.
Collecting quest items 🎒
When your objective asks for an item, find the named item and touch it to collect it. Look for its name in the hover text and wait for the pickup confirmation.
Quest items go into your mission inventory, rather than your avatar's regular inventory. You do not need to accept an inventory offer or wear them. The mission handles a required handover when you reach the right step.
You can collect an item only when your current mission needs that pickup. Touching an unneeded item may do nothing. Items from one mission cannot be saved up for another.
Completing activities ⏳
Some jobs ask you to search, clean, work a shift or perform another activity.
Find the activity named in your current objective.
Sit on it to begin the work.
Stay seated while its hover-text countdown runs, shown as minutes and seconds.
Wait for the completion confirmation, then follow the next objective.
Standing up early does not fail your mission. It resets that activity's countdown, so you must sit again and complete the work before continuing. If you no longer want to do the mission, abandon it through a Missions board instead.
If another resident is using the activity, wait until it is available. An activity that is not your current objective will stand you up and explain that you cannot perform that action yet.
Checking progress or stopping
Touch a Missions board and choose My mission to check your active mission, next objective and carried quest items. If you have no active mission, it will tell you.
You can have one active mission at a time. To stop, choose Abandon on a board and confirm. Abandoning counts as an attempt for the SLT day you abandon it and cannot be undone.
Daily attempts and rewards 🎁
You have three mission attempts per Second Life calendar day, shared across all boards.
An active mission reserves one attempt. When you complete, fail or abandon it, it counts toward the day it ends.
You cannot replay the same mission on the day you complete, fail or abandon it.
Attempts reset at midnight Second Life Time (SLT). Your active mission never expires: keep your progress and finish it another day whenever you are ready.
Successfully completing a mission awards its displayed number of banked bonus spins. These remain available to use later.
Complete three missions successfully on the same SLT day to earn the separate L$5 daily bonus. A mission started on an earlier day counts when you finish it.
Wait for the mission's completion and reward confirmation. You do not need to touch the Wheel immediately to keep your earned spins.
Need a hand?
An NPC will not open a conversation. Move close to the character and touch again. Check My mission to make sure they are your current stop.
An item does nothing when touched. Check the exact item and your current objective. Complete any earlier conversation or activity first.
An activity will not start or stands me up. Check that it is the activity your mission currently requires. Wait if another resident is using it.
I lost my dialogue. Touch the NPC again. Closing a menu does not spend another attempt.
The mission I wanted is no longer featured. The board rotates its offer. Your active mission stays with you; use My mission to check it.
A reward or mission seems stuck. Give the confirmation a moment to arrive, then check your current mission again. For help, contact BossyIsabella Resident in-world with your avatar username, mission name, approximate time and the message you received.
More ways to play at Lucky Lounge ✨
Your next bit of luck could be waiting after the job is done.
Wheel of Fortune & Weekly Raffle location:Click Here
🎡 The Wheel of Fortune
Wear your JoY! Growables group tag, stand close to the Wheel and touch it for your free daily spin. Your avatar must be at least seven days old to spin.
Play for free JoY! drugs and other rewards. After your free daily spin, you can use the bonus spins earned from Missions. If you have no spins available, the Wheel tells you how long remains until your next daily spin. If it is busy, wait for the current player to finish.
Stay online to receive a prize and accept any incoming inventory offer. If you win an instant harvest, one eligible Growable becomes ready; visit it and harvest or collect from it yourself.
🎟️ The Weekly Raffle
Wear your JoY! Growables group tag and touch a raffle board to enter for free. Wait for the confirmation that your entry was saved.
All boards share one global raffle, with one entry per resident each week. Touching more boards does not add entries. The display shows the countdown and how many residents have joined.
One winner is drawn every Sunday at 00:00 SLT — midnight as Saturday turns into Sunday. You do not need to be online for the draw; if you win while offline, your prize waits until you are online for delivery.
A new raffle starts for the next week. Touch a board again to enter the new draw. Good luck! 💚
PLAY YOUR ROLE
Get help from dealers and medics
Dealers supply virtual drugs and support dealer roleplay. Medics provide treatment during withdrawal, rehabilitation, and pass-out states.
Ask a dealer for supplies or assistance
A dealer can provide inventory items, administer Heroin from their HUD, and certify stock for customers using Hard mode. A direct HUD injection does not require the dealer to hand over a syringe item.
Dealers can also scan your status, favorite drug, and addiction level, or administer Ketamine to reduce addiction as far as 2%. Their HUD supports pass-out roleplay: Phenobarbital can extend your pass-out and grant the dealer temporary teleport permissions.
Contact a dealer and explain what you need. If you are sick and use the standard HUD, the red phone can help you find online dealers.
Agree on the service before accepting the HUD's scan or injection prompt.
If offered a customer-list invitation, review the ongoing permissions before accepting it.
A dealer's scan or injection normally asks for your approval. Listed customers do not receive those individual prompts, and consent is disabled during pass-out. Joining a dealer's customer list is an ongoing permission: you cannot remove yourself through the HUD. Ask the dealer to remove you.
You can accept or decline an ordinary approval prompt. A customer invitation is a separate choice from agreeing to a single scan or injection.
Arrange treatment with a medic
A medic can select a substitute medicine to relieve withdrawal during rehabilitation, administer Ketamine down to the 2% floor, and end a pass-out with Naloxone.
Medic scans include your current state, favorite drug, addiction level, consumption history, and estimated rehabilitation time. The scan can help the medic choose an appropriate substitute.
Tell the medic whether you need withdrawal relief, addiction reduction, or help with a pass-out.
Approve a requested scan or injection. You can decline the prompt.
Alternatively, accept a patient invitation for temporary treatment permission. The medic can register only 1 patient at a time.
After a parcel teleport or relog, check whether the patient connection needs to be established again. The medic can release you with CLEAR.
While you are a registered patient, the medic can scan or inject you without another individual approval prompt. Discuss the treatment before accepting the patient invitation.
Note: The rehabilitation countdown is accurate when you are sick and addiction is decreasing. At other times it is an estimate. For a non-addicted user in recovery, it describes the time until the normal state.
See Treatment reference for medicine effects and the drug-to-substitute table.
PLAY YOUR ROLE
Dealer handbook
Set up your Dealer HUD, prepare transferable stock, certify supplies, and manage customer permissions.
Set up your Dealer HUD
Purchase the JoY! Dealer HUD and select Add in your inventory to attach it.
Long-click the smiley face with the left mouse button to open its controls. A pink dealer panel appears to the right of the face.
Keep a shortcut in Favourite Wearables if your viewer provides that feature. Use the shortcut to attach the HUD after changing outfits.
Do not link the Dealer HUD into outfits. Outfit changes can attach an outdated HUD or switch your HUD unexpectedly. When changing HUD type, remove the current HUD before adding the replacement.
Find a nearby user and read their status
The green radar control, sometimes described as the Wi-Fi button, lists JoY! users on the same parcel. Select it to print their names in Nearby Chat; your viewer's mini-map can help you locate them.
The JOY DEALER: message prefix identifies your HUD as the sender. It does not mean every person in the list is a dealer, and the radar does not tell you which HUD role they use.
Move within 5 meters of the JoY! user.
Select the blue information control to request a saliva scan.
Wait for the user's approval unless they are already on your customer list.
Read the scan output in Nearby Chat.
A healthy user's output can look like this:
Clean Junkie's Saliva Sample Analysis:

Status: normal (healthy)
Addiction: 0%
Fav drug: none (0)
Mode: NORMAL
Status describes the current HUD state. Addiction is the user's addiction percentage. Fav drug identifies their favorite drug, if any. Mode reports Hard only for an addicted user with Hard mode active; other users appear as Normal.
Unpack inventory supplies
Open a 10-pack
Buy the pack you need and go to a location where you may rez objects.
Rez the pack's box. Its smiley-face particles can help identify it.
Right-click the box and select Open.
Select Copy objects to Inventory..., then confirm the transfer prompt.
Open the new inventory folder and check that it contains the individual doses.
Note: These items have no-copy permissions. Despite the viewer's “Copy” label, unpacking transfers the items; it does not create an extra supply.
Open a larger pack
Bulk stock is normally packaged as an outer box containing multiple 10-pack boxes.
Rez and open the outer box, then transfer its contents to your inventory.
Verify that the inner boxes arrived before deleting the empty outer box.
Use the 10-pack procedure for each inner box you want to open.
For locations and community-run suppliers, see Where to buy.
Load Heroin for direct injections
The Dealer HUD takes a dedicated refill product, JoY! HUD Heroin (x10), also described by suppliers as “Heroin for the Dealer HUD.” This is separate from ordinary inventory syringes.
Make sure you are wearing the Dealer HUD.
Purchase the dedicated HUD refill and select Add on its package.
Watch the temporary refill HUD. It shows a boxed smiley face and the message Sending.
Wait for Transfer Complete before removing the refill HUD.
Detach and delete the spent refill. It cannot be used a second time.
Ordinary Heroin syringes cannot refill the Dealer HUD. Dragging them into it does not work. The Medic HUD cannot store Heroin.
Give a direct HUD injection
Move within 5 meters of the intended user and agree on the injectable.
Select the syringe control.
Select the target in the blue dialog by their username. The menu uses usernames rather than display names.
In the next dialog, select Heroin or Ketamine, as agreed.
Wait for the target's approval if they are not already a listed customer. Respect any injection cooldown before trying again.
Check Nearby Chat for the response and, when using Heroin, the remaining HUD dose count.
The approval prompt may not reveal which injectable you selected. Tell the user what you plan to administer before sending it.
Understand Ketamine limits
Ketamine is built into the Dealer HUD, costs no supply fee, and is unlimited. It ends the current high and reduces addiction, but cannot take addiction below 2% or treat a healthy user.
The reduction depends on addiction, resistance, and the favorite drug. Higher addiction or resistance, and a stronger favorite drug, reduce its efficiency. A cooldown prevents immediate repeated treatment. See Treatment reference for its effects.
Give inventory items to a customer
Locate the intended dose in your inventory.
Drag it onto the recipient's profile or into your direct-message window with them.
For several doses, put them in a folder and transfer the whole folder.
Check your remaining stock. Remove an empty folder after confirming that its contents were transferred.
Avoid repeated clicks on a dose while selecting it. Accidentally adding the item can consume it on your own avatar. Transferred no-copy stock leaves your inventory.
Manage customer permissions
The customer list holds up to 30 users. A listed customer does not receive separate consent prompts for saliva scans or injections, although injection cooldowns still apply.
Explain the ongoing scan and injection permissions before inviting a customer. They cannot remove themselves through the HUD; the dealer must remove them.
Invite a customer
Long-click the HUD's smiley face with the left mouse button to open the pink dealer panel.
Select the plus (+) control.
Select the nearby user you want to invite in the blue dialog.
Ask them to review the Yes/No invitation. They join the list only after accepting it.
Review or remove customers
Long-click the smiley face and select the list control, shown as a lines icon.
Select List to print the numbered customer list in Nearby Chat.
To remove one user, select Remove and enter their number from that list.
To remove everyone, select Flush.
Flush clears the entire customer list. Use Remove when you intend to release only one customer.
Recognize pass-out and teleport permissions
In the JoY! simulation, gaining more than 1% addiction in less than 5 minutes can cause a 2-minute pass-out. Additional consumption while already high can contribute to that increase; an injection cooldown limits repeated direct injections.
When a nearby user has already passed out, the Dealer HUD can offer Phenobarbital. It adds 5 minutes of deep sleep and grants RLV teleport exceptions for the same 5 minutes. During that window, the dealer can use Force TP to move the user. Phenobarbital is embedded in the HUD.
Consent is disabled during pass-out. Agree on the boundaries of this roleplay beforehand. A customer-list relationship also bypasses ordinary injection prompts before a pass-out; other conscious users normally receive an approval prompt.
Prepare certified stock for Hard mode
An addicted Hard mode user needs certified items to receive the intended effect and normal-state duration. Uncertified shop items provide shorter effects and shorter normal time. Direct HUD injections are already treated as certified.
Certification records the dealer's identity inside the item and adds certified to its name. When an addicted Hard mode user consumes it, the system identifies the certifying dealer. Normal-mode users receive the same effects from certified and uncertified stock.
Detach your Dealer HUD while arranging stock to reduce the chance of accidentally consuming an item.
Rez the individual doses at a location where you may rez objects. A plain, contrasting surface can make them easier to select.
Add the Dealer HUD and stand near the doses.
Long-click the smiley face to open the menu, then select Certify. You can certify several nearby items in one action.
Check Nearby Chat for confirmation, then verify that the item names end in certified.
Detach the HUD before collecting the stock.
Right-click each dose and select Take..., then Take. Select the dose itself rather than the surface beneath it.
Check the items in inventory before transferring them to a customer. They should return to their original folders with their certified names.
A Hard mode dealer cannot satisfy their own certification requirement by certifying stock for themselves. Obtain stock certified by another dealer.
Note: Certification support was added to shop stock on 22 July 2025. Older stock may not support it; reserve such items for normal-mode users. The original JoY! shops and Marketplace do not supply dealer-certified items. For an additional community system that produces certified JoY! drugs, see JoY! Growables.
Certification seals the dealer ID into the item; that identity cannot be removed. Inventory transfers alone do not perform certification, so rez the stock and use the HUD control before selling it. You can prepare certified stock in advance to simplify orders.
Keep stock easy to count
One practical inventory arrangement is a main JoY! folder with a separate subfolder for each drug, such as JoY! Heroin.
Store loose doses in the corresponding drug folder.
Keep complete 10-pack folders inside that drug folder.
After splitting a pack, move the spare loose doses into the drug folder. A remaining full-pack folder then still represents exactly 10 doses.
Transfer a full pack by giving its folder, then remove the empty folder left behind.
Understand addiction and dealer recognition
The Dealer HUD can consume virtual drugs just like the standard HUD. You do not need to switch HUDs to participate in consumption roleplay.
Dealer recognition depends on using the Dealer HUD and remaining clean. Once you become addicted, you can lose the JoY! Dealer and JoY! Official Dealer group tags and group access. See Community roles for the automated checks and return requirements.
Note: Switching to the standard HUD can also interrupt dealer recognition and restart the waiting period. Keep using the appropriate HUD for your role.
PLAY YOUR ROLE
Earn and keep group roles
Juliette checks JoY! roles in the common group and dealer group once per hour. Role assignment is automated to keep the membership lists current; you do not need to request each change manually.
Dealer and medic HUDs provide the same consumption and addiction features as the free user HUD. Keep your role's HUD attached when consuming. Switching to the normal HUD can reset your role eligibility.
Qualify for the dealer role
Dealers are expected to know the system, remain clean, and be available to supply other users. When you first obtain the dealer HUD, or return to it after using the normal HUD, use the dealer HUD for one week before Juliette assigns the dealer role and sends the dealer group invitation.
Being away or not using the system for more than one week removes the role and dealer group membership.
Addiction prevents you from receiving or retaining the dealer role. Once you are clean again, the role should return.
Using a medic HUD for more than 7 days, or being away for more than 7 days, can also remove dealer group membership. Juliette sends a new invitation when she detects your return as a dealer.
Wearing the normal HUD signals a role change and starts the 7-day dealer qualification period again.
The dealer group gives access to the shop's dealer corner vendor for discounted bulk purchases. Losing membership after an absence or a change of HUD is part of the automated role management.
If you block Juliette, you cannot receive her dealer group invitations. Unblock the bot if you want to receive them.
Qualify for the medic role
The medic role is for users who want to help others. New medics receive the role after using the medic HUD for one week. A week without using it, or switching to the normal HUD, removes the role.
A reported bug in version 3.1.4 can destroy stored Heroin when the Dealer and Medic HUDs are worn together during a switch. Remove your current HUD before attaching the other type.
Keep the Hardcore role in sync
Juliette adds or removes the Hardcore group role automatically according to your Hard mode setting.
SETTINGS AND SUPPORT
HUD settings and certification
The HUD has controls for active effects, optional roleplay settings, public availability, and dealer certification. The menu you can use depends on your current state and how long you hold the HUD.
Control Project Arousal during an effect
A PA2 plugin connects the JoY! HUD to Project Arousal 2 and triggers moaning while you are high.
When a drug effect begins, hold the HUD for more than 3 seconds.
Select PA2 OFF to skip the moaning for that effect.
End an active effect with Ruin
While high, hold the HUD for more than 3 seconds and select RUIN to shorten the current effect. Some drugs disable this control, and Hardcore mode prevents its use.
For the settings below, hold the HUD for more than 1 second to open its menu. You can access this menu at any time.
Set the login behavior with Shitty Mornings
Shitty Mornings simulates an addicted user's depressed, needy state after time away. When enabled, logging into Second Life after 6 real-world hours starts you in the depressed state automatically.
Use the HUD menu to turn the feature on or off. You can disable it whenever you want unless Hardcore mode has locked it.
Understand Hardcore mode before enabling it
For an addicted user, Hardcore mode enables and locks both Shitty Mornings and No Shop!. They remain locked until the user is clean or cured.
You can enable Hardcore mode while healthy. Its restrictions take effect if you later become addicted.
How No Shop! changes purchased doses
No Shop! is activated automatically by Hard mode and is no longer a separate option. Ordinary doses bought from the Marketplace or in-world shops produce a shorter, less satisfying effect and a shorter normal period.
A dealer-certified dose provides the usual effect and normal duration for users affected by this restriction. Direct injections are always treated as certified.
Hard mode also changes recovery and effect controls:
A cure syringe lowers addiction to 2%, rather than the 0% available to an addicted user outside Hardcore mode.
While sick, addiction decreases at half the normal rate: recovery is 2 times slower.
The Ruin control is unavailable.
Choose this mode when you want the roleplay to depend more on dealers and other participants. If you prefer consuming alone or cannot meet dealers, these restrictions may not suit how you use JoY!.
Dealer and medic scans show mode: Hard only when a user is both addicted and using Hardcore mode. Other users are reported as mode: Normal and gain no extra effect from certification.
Choose whether dealers and medics appear publicly
The Online setting controls public availability for a dealer or medic. Public listing is enabled by default.
Select this option to switch to private availability. Your name then disappears from shop TV listings and the red phone's list. Select it again to return to public availability.
Private availability is useful when you use the HUD's features within a private community or wear it without joining the public dealer network.
Supply certified doses to Hard mode users
Certification seals a dealer's ID into a dose. It establishes that an eligible dealer has handled the product before passing it to a customer. This matters because purchases and inventory-to-inventory transfers do not change the ownership information JoY! needs to check.
When an affected Hard mode user consumes the dose, JoY! identifies the certifying dealer in a notification. Normal users do not see this message.
Certify doses before transferring them
Rez the drug doses in-world.
Hold the dealer HUD to open its menu.
Select Certify. You can certify several rezzed doses in the same action.
Check that each dose's name ends with certified before giving it to a customer.
The sealed dealer ID cannot be removed. Customers can check the product name for certification before buying or using a dose. Certified doses are not supplied by the original shops or Marketplace listings.
The original shop stock changed on 22 July 2025 to support certification. Older supplies may not be certifiable. Reserve those doses for normal users and use newer stock when certification is required.
A Hardcore user cannot certify a dose for their own use. Buying a dealer HUD does not allow you to bypass that restriction with your own purchases.
For a normal user, certified and ordinary doses work identically. Certification adds no special effect, improved experience, or certification message for that user.
Stop the high animations
Select AO to stop the avatar animations associated with being high. Some drugs, including Krokodil, still apply certain animations even when this control is used.
SETTINGS AND SUPPORT
Companion accessories
These additional JoY! products connect to the main HUD for withdrawal timing and adult roleplay interactions.
Track withdrawal timing with the Golden Watch
The Golden Watch is a unique gacha item awarded when you reach 100% addiction. It shows how long remains before withdrawal and sounds an alert 5 minutes before the first sad or blue withdrawal face appears, helping you plan when to consume.
Add the watch to your avatar. It synchronizes with your JoY! HUD automatically.
Click the watch once to print the remaining time in chat.
Hold the watch to toggle the time display above it.
The watch is modifiable, so you can adjust its fit on your wrist. You can also move its script into another attachment, but the script's permissions may make that attachment no-modify or no-copy.
Share an effect with the cumJoY! HUD
The cumJoY! HUD allows a donor to share a JoY! effect with a sexual partner through an adult roleplay interaction.
Prepare the participants
The donor must be high or recovering. Both participants must be sitting and approximately 1 meter apart.
The HUD displays Idle while these conditions are unmet. It changes to Ready once the interaction is available.
Trigger the interaction
When the HUD shows Ready, use one of these methods:
Trigger ejaculation through the P cock integration.
Click the cumJoY! HUD.
Trigger ejaculation through Mama Allpa. This integration is experimental.
The HUD then shows cumming, followed by a 2-minute reloading period before another interaction is available.
This form of transfer adds only 0.1% addiction and does not establish drug habits.
SETTINGS AND SUPPORT
Install a HUD update
New HUD versions are delivered through Marketplace redelivery or the HUD's CasperVend delivery system. Replace your HUD using the transfer procedure below to carry your existing data into the new version.
Recognize an update from Juliette
If your HUD is outdated, Juliette sends the replacement and an instant message when you log in, at most once per day. Continued deliveries indicate that the worn HUD still needs updating. Installing the current version stops those reminders.
Transfer your data to the new HUD
Wait until you are neither high nor passed out. The replacement HUD should reject an update attempted in either state.
Add the new HUD while your existing HUD is still attached.
Wait for the HUDs to transfer your data and for the older HUD to detach automatically.
Delete the detached, outdated HUD from your inventory.
HUD versions in the 1.5 series and later also transfer the screen position, so the replacement should appear where you placed the previous HUD.
While in the healthy workflow, you can safely remove the old HUD before attaching a replacement. To retain details such as your favorite drug and current addiction level, use the transfer procedure with both versions attached.
Keep one current HUD in use. Avoid adding HUD copies or links to outfits and RLV folders: they can reattach an older version over the current one, causing repeated detachment and unpredictable behavior. Updating every stored link also makes future replacements harder to manage.
SETTINGS AND SUPPORT
System data and asset credits
This section describes the JoY! system's documented network requests and data handling. The JoY! Community maintains this guide; the behavior described here belongs to the JoY! HUD and its supporting services.
At login, the HUD makes one internet request to check the current version.
If an update is available, it makes an additional HTTP request to Juliette to trigger redelivery and displays an update notification.
Using the red phone makes a request for the list of available dealers.
According to the JoY! system's documentation, other data stays within the HUD, with these listed exceptions to local-only storage:
Addiction percentage.
The dealer HUD's heroin dose count.
The customer list.
The Hardcore mode setting.
Recognize the contributing creators
JoY! uses the following full-permission objects and animations. Product titles and creator names are retained here to identify the original assets.
Objects used by JoY!
Joint: 3DG Joint v3 FULL PERMS from Don (don.duke).